
-
Integrations
- Articles coming soon
-
Marketing
-
- Advertising white-label eCommerce solution to your customer ecosystem
- Advertising compliance and brand usage guidelines for partners
- How to create high-converting advertisements for your eCommerce platform
- How to run advertising campaigns to attract online merchants and resellers
- How to measure advertising performance and generate qualified merchant leads
-
- How to promote your eCommerce platform using consistent branding
- White-Label eCommerce branding strategy for partners
- Crafting effective brand messaging for eCommerce platforms
- Positioning your eCommerce platform for different merchant segments
- Maintaining brand consistency across marketing channels
-
- Creating High-Impact eCommerce marketing assets for partners
- Designing eCommerce sales decks that convert merchants
- Creating eCommerce landing pages that convert traffic into merchants
- Creating eCommerce case studies that build trust and close deals
- Creating Email campaigns that drive eCommerce adoption
-
-
Partner Hub
-
- Articles coming soon
-
- Articles coming soon
-
-
Sales
-
- Articles coming soon
-
- Articles coming soon
-
- Articles coming soon
-
- Articles coming soon
-
- Articles coming soon
-
-
Technical and Support
-
- Articles coming soon
-
- Articles coming soon
-
- Articles coming soon
-
- Articles coming soon
-
- Articles coming soon
-
- Articles coming soon
-
-
-
-
-
-
-
- Payment methods at eCommerce Store
- Setting up Stripe Payment Gateway
- Setting up Paypal in your Online Store
- Setting up CashFree Gateway
- Setting up RazorPay Gateway
- Setting up Paystack gateway
- Setting up Flutterwave Gateway
- Setting up Mercado Pago Gateway
- Setting up Mamo Pay Gateway
- Setting up Yoco Gateway
- Setting up Nets Easy Gateway
- Setting up Vipps Gateway
- Setting up Mollie Gateway
- Setting up Epoint Gateway
- Setting up Iyzico Gateway
- Setting up Payriff Gateway
- Setting up Crypto Payments through Nicky
- What is Cash on Delivery?
- Show Remaining Articles (3) Collapse Articles
-
- How to create an analytics account?
- Connecting Google Analytics to your eCommerce store
- Connecting Meta Pixel to your eCommerce store
- Connecting Tik Tok Pixel to your eCommerce store
- Connecting Google Tag Manager to your eCommerce store
- Managing product reviews & ratings in your eCommerce store
- Using marketing automation to drive urgency and social proof
- Setting up your LLMs.txt integration to boost your AI search visibility
- Automating manual order fulfilment and live tracking with Shiprocket
- Automating search engine discoverability with dynamic sitemaps
- Automate, optimise, scale: Building your Google shopping product feed
- How to sync your product catalog with meta ads to drive more sales
-
- Articles coming soon
-
- Articles coming soon
-
- Articles coming soon
-
Connecting TikTok Pixel to your eCommerce Store
The TikTok Pixel is a piece of code added to your store to track customer actions and measure the impact of your TikTok advertising campaigns. It helps you understand user behavior, optimize ad targeting, and evaluate the performance of your ads.
The pixel tracks important store events—such as page views, add-to-cart actions, purchases, and more—allowing you to create better audiences, serve relevant ads, and drive higher conversions.
It collects standard web data such as event details, timestamps, IP address, user agent, and browser cookies.
How to add TikTok Pixel to your eCommerce Store
Before adding the pixel, ensure you have created your TikTok Pixel inside TikTok Ads Manager. If you haven’t created one yet, follow the steps in the “Steps to Create Your TikTok Pixel” section below.
To add the TikTok Pixel to your store:
- Log in to your eCommerce admin panel.
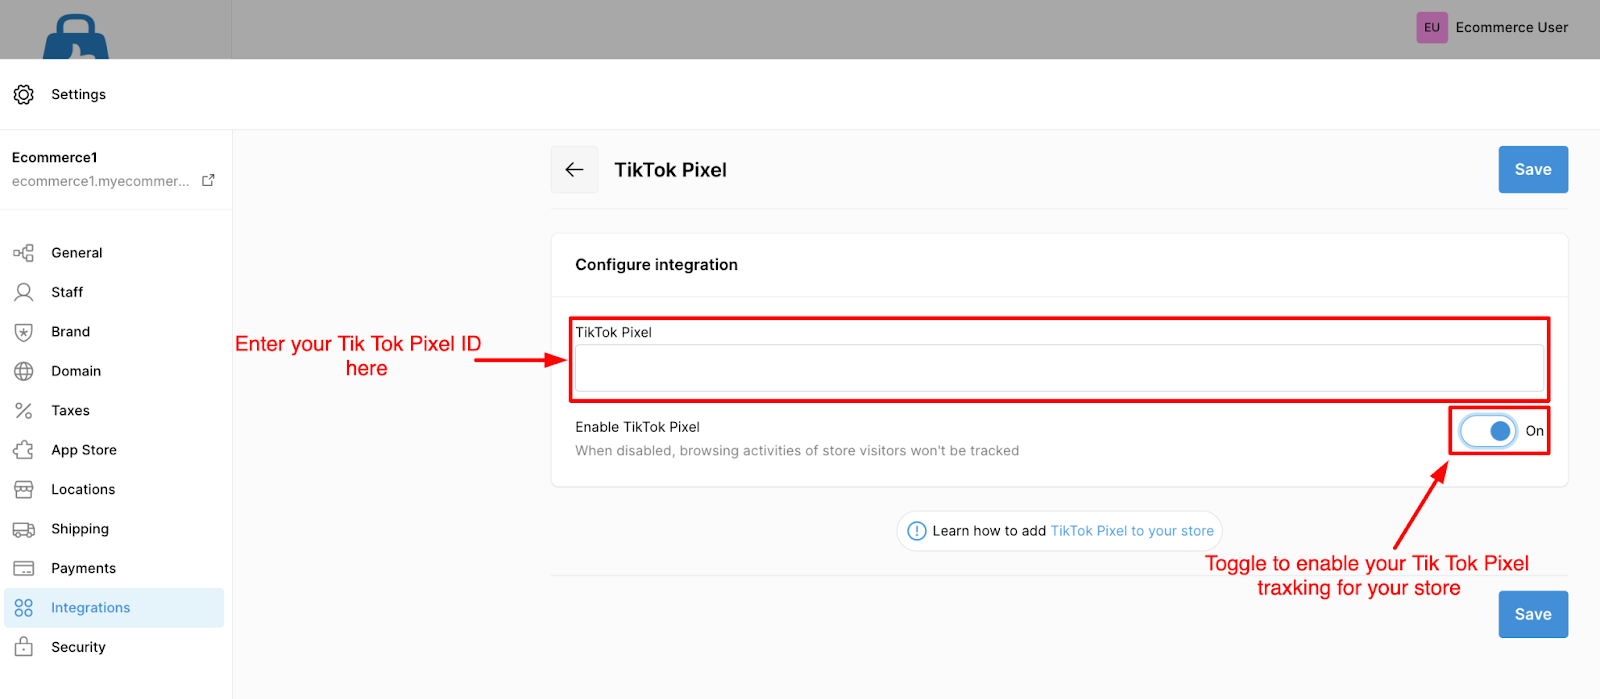
- Go to Settings → Integrations.
- Click Add next to TikTok Pixel.
- Enter your TikTok Pixel ID in the input field.
- Done! Your store is now connected to TikTok Pixel.
How to create and access your TikTok Pixel
To create a TikTok Pixel, you must first have a Tik Tok Business Account.
Steps to create your TikTok Pixel:
- Sign in or register for a Tik Tok Business Account.
- Go to TikTok Ads Manager → Assets → Events.
- Under Website Events, click Manage.
- Click Create Pixel.
- Enter a recognizable name for your pixel.
- Choose Manually Install Pixel Code.
- Done! Your TikTok Pixel is created.
Your Pixel ID will be included inside the base pixel script generated for you.
For more details, refer to the TikTok Business Help Center.
What are TikTok Pixel Events?
Events are specific actions customers take on your store that help you measure campaign effectiveness and build optimized audiences.
TikTok supports 14 standard pixel events, including:
| Add Payment Info | Add to Cart | Add to Wishlist |
| Click Button | Complete Payment | Complete Registration |
| Contact | Download | Initiate Checkout |
| Place an Order | Search | Submit Form> |
| Subscribe | View Content> |
These events help TikTok understand which customer actions matter most for your campaigns.
How to test if your TikTok Pixel is working Correctly
TikTok provides a diagnostic tool called the TikTok Pixel Helper—a Chrome extension that verifies if your pixel is installed and firing properly.
To test your Pixel:
- Add your TikTok Pixel ID to your eCommerce store.
- Install the TikTok Pixel Helper Chrome extension.
- Open a new browser tab and paste your store URL followed by: ?dbgrmrktng
Example: yourstore.myecommerce.com/?dbgrmrktng - The extension will display the status of your pixel and events in real time. It will also flag any errors or missing parameters.