
-
Integrations
- Articles coming soon
-
Marketing
-
- Advertising white-label eCommerce solution to your customer ecosystem
- Advertising compliance and brand usage guidelines for partners
- How to create high-converting advertisements for your eCommerce platform
- How to run advertising campaigns to attract online merchants and resellers
- How to measure advertising performance and generate qualified merchant leads
-
- How to promote your eCommerce platform using consistent branding
- White-Label eCommerce branding strategy for partners
- Crafting effective brand messaging for eCommerce platforms
- Positioning your eCommerce platform for different merchant segments
- Maintaining brand consistency across marketing channels
-
- Creating High-Impact eCommerce marketing assets for partners
- Designing eCommerce sales decks that convert merchants
- Creating eCommerce landing pages that convert traffic into merchants
- Creating eCommerce case studies that build trust and close deals
- Creating Email campaigns that drive eCommerce adoption
-
-
Partner Hub
-
- Articles coming soon
-
- Articles coming soon
-
-
Sales
-
- Articles coming soon
-
- Articles coming soon
-
- Articles coming soon
-
- Articles coming soon
-
- Articles coming soon
-
-
Technical and Support
-
- Articles coming soon
-
- Articles coming soon
-
- Articles coming soon
-
- Articles coming soon
-
- Articles coming soon
-
- Articles coming soon
-
-
-
-
-
-
-
- Payment methods at eCommerce Store
- Setting up Stripe Payment Gateway
- Setting up Paypal in your Online Store
- Setting up CashFree Gateway
- Setting up RazorPay Gateway
- Setting up Paystack gateway
- Setting up Flutterwave Gateway
- Setting up Mercado Pago Gateway
- Setting up Mamo Pay Gateway
- Setting up Yoco Gateway
- Setting up Nets Easy Gateway
- Setting up Vipps Gateway
- Setting up Mollie Gateway
- Setting up Epoint Gateway
- Setting up Iyzico Gateway
- Setting up Payriff Gateway
- Setting up Crypto Payments through Nicky
- What is Cash on Delivery?
- Show Remaining Articles (3) Collapse Articles
-
- How to create an analytics account?
- Connecting Google Analytics to your eCommerce store
- Connecting Meta Pixel to your eCommerce store
- Connecting Tik Tok Pixel to your eCommerce store
- Connecting Google Tag Manager to your eCommerce store
- Managing product reviews & ratings in your eCommerce store
- Using marketing automation to drive urgency and social proof
- Setting up your LLMs.txt integration to boost your AI search visibility
- Automating manual order fulfilment and live tracking with Shiprocket
- Automating search engine discoverability with dynamic sitemaps
- Automate, optimise, scale: Building your Google shopping product feed
- How to sync your product catalog with meta ads to drive more sales
-
- Articles coming soon
-
- Articles coming soon
-
- Articles coming soon
-
Print
Posted
Updated
ByeCommerce Admin
How to create sub menus and mega menus?
Submenus and mega menus help you organize your store’s navigation into clear, structured layers — making it easier for visitors to browse collections, policies, or other key pages.
A submenu appears when you hover over or click a main menu item, while a mega menu displays multiple related subcategories under one section.
Create a submenu
To create a submenu under your Main or Side menu:
- Log in to your store’s Admin Panel.
- Go to Online Store → Navigation.
- Select the menu you want to edit (Main Menu or Side Menu.)
- Find the menu item you want to use as the parent item.
- Drag and drop the menu item you want to nest underneath it. The item will be indented to position it as a submenu.
- Reorder submenu items by dragging them up or down.
- Click Save when done.
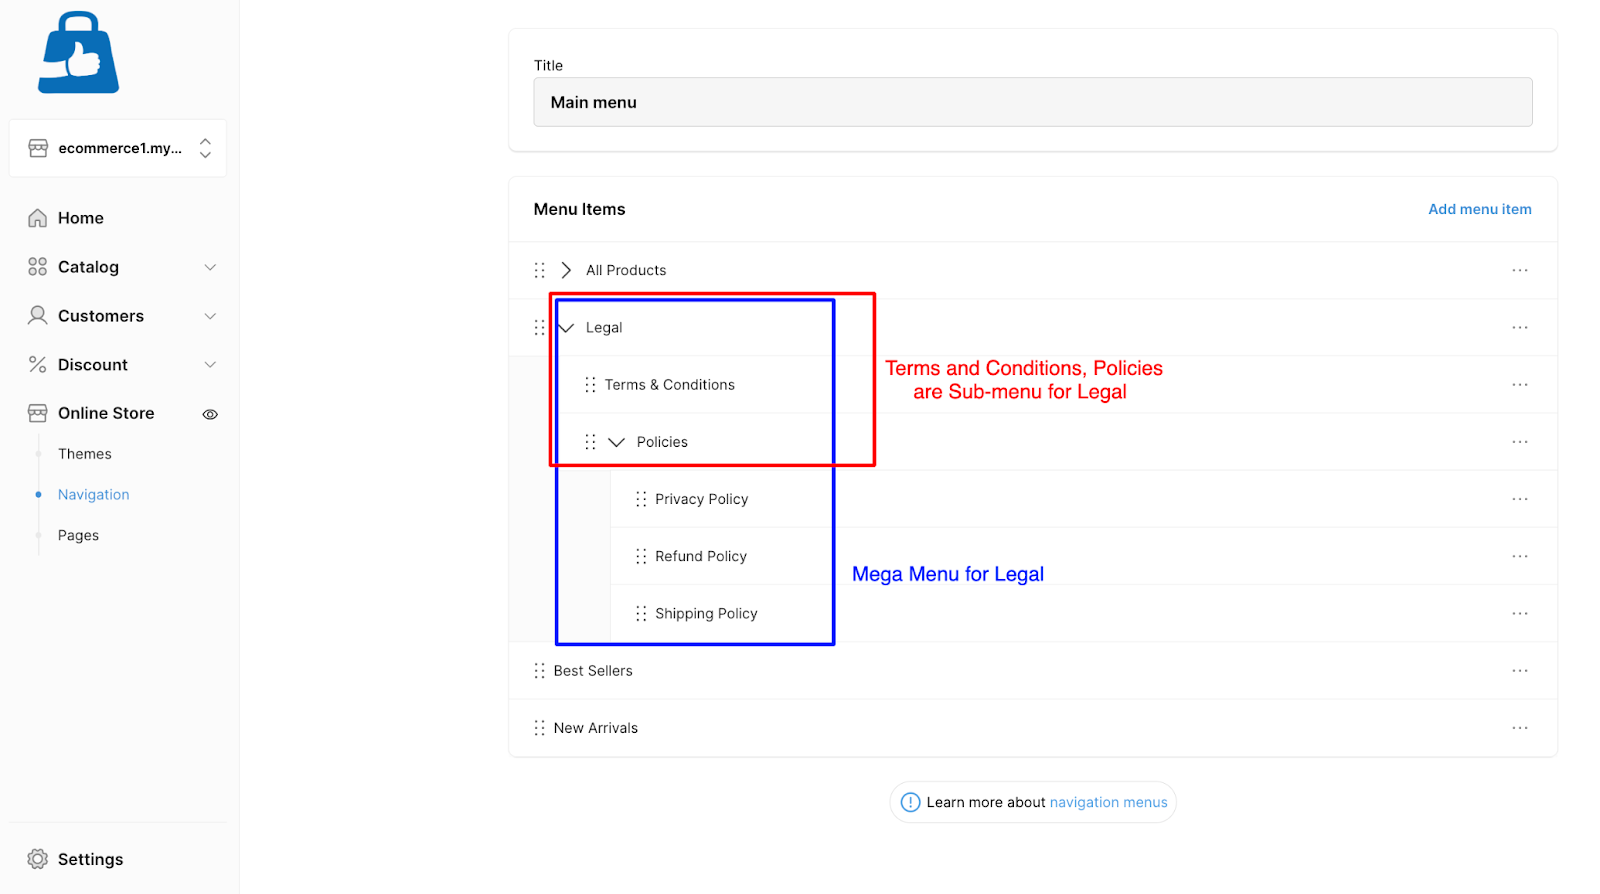
Example:
- If you drag “Terms & Conditions” and “Policies” under “Legal,” you create a submenu.
- If you then drag “Refund Policy,” “Privacy Policy,” and “Shipping Policy” under “Policies,” you create a mega menu under “Legal.”
Tips for Organizing Submenus
- Keep your menu structure simple — avoid more than 2 levels of depth.
- Use clear, short labels (e.g., “Support,” “Shop by Category”).
- Group related items together for easy navigation.
- Preview your menu after saving to ensure links and hierarchy appear as intended.