
-
Integrations
- Articles coming soon
-
Marketing
-
- Advertising white-label eCommerce solution to your customer ecosystem
- Advertising compliance and brand usage guidelines for partners
- How to create high-converting advertisements for your eCommerce platform
- How to run advertising campaigns to attract online merchants and resellers
- How to measure advertising performance and generate qualified merchant leads
-
- How to promote your eCommerce platform using consistent branding
- White-Label eCommerce branding strategy for partners
- Crafting effective brand messaging for eCommerce platforms
- Positioning your eCommerce platform for different merchant segments
- Maintaining brand consistency across marketing channels
-
- Creating High-Impact eCommerce marketing assets for partners
- Designing eCommerce sales decks that convert merchants
- Creating eCommerce landing pages that convert traffic into merchants
- Creating eCommerce case studies that build trust and close deals
- Creating Email campaigns that drive eCommerce adoption
-
-
Partner Hub
-
- Articles coming soon
-
- Articles coming soon
-
-
Sales
-
- Articles coming soon
-
- Articles coming soon
-
- Articles coming soon
-
- Articles coming soon
-
- Articles coming soon
-
-
Technical and Support
-
- Articles coming soon
-
- Articles coming soon
-
- Articles coming soon
-
- Articles coming soon
-
- Articles coming soon
-
- Articles coming soon
-
-
-
-
-
-
-
- Payment methods at eCommerce Store
- Setting up Stripe Payment Gateway
- Setting up Paypal in your Online Store
- Setting up CashFree Gateway
- Setting up RazorPay Gateway
- Setting up Paystack gateway
- Setting up Flutterwave Gateway
- Setting up Mercado Pago Gateway
- Setting up Mamo Pay Gateway
- Setting up Yoco Gateway
- Setting up Nets Easy Gateway
- Setting up Vipps Gateway
- Setting up Mollie Gateway
- Setting up Epoint Gateway
- Setting up Iyzico Gateway
- Setting up Payriff Gateway
- Setting up Crypto Payments through Nicky
- What is Cash on Delivery?
- Show Remaining Articles (3) Collapse Articles
-
- How to create an analytics account?
- Connecting Google Analytics to your eCommerce store
- Connecting Meta Pixel to your eCommerce store
- Connecting Tik Tok Pixel to your eCommerce store
- Connecting Google Tag Manager to your eCommerce store
- Managing product reviews & ratings in your eCommerce store
- Using marketing automation to drive urgency and social proof
- Setting up your LLMs.txt integration to boost your AI search visibility
- Automating manual order fulfilment and live tracking with Shiprocket
- Automating search engine discoverability with dynamic sitemaps
- Automate, optimise, scale: Building your Google shopping product feed
- How to sync your product catalog with meta ads to drive more sales
-
- Articles coming soon
-
- Articles coming soon
-
- Articles coming soon
-
Setting up Nets Easy Payment Gateway
Nets Easy Payments allows online merchants across Europe to seamlessly accept payments through a wide range of payment methods — including major debit/credit cards and the most popular alternative payment options.
Integrating Nets Easy with your eCommerce store is simple and requires only a supported store currency and your Nets Easy API credentials. Once configured, you can start accepting secure online payments immediately.
How to set up Nets Easy Payment Gateway in your eCommerce Store
Step 1: Navigate to Payment Settings
- Log in to your eCommerce admin panel.
- Go to Settings → Payments.
- Click on Add payment method.
Step 2: Select Nets Easy
- If your store currency is supported, choose Nets Easy from the list of available payment providers.
- If Nets Easy does not appear, refer to the section “Nets Easy isn’t available with your store currency” below.
Step 3: Enable the Payment Method
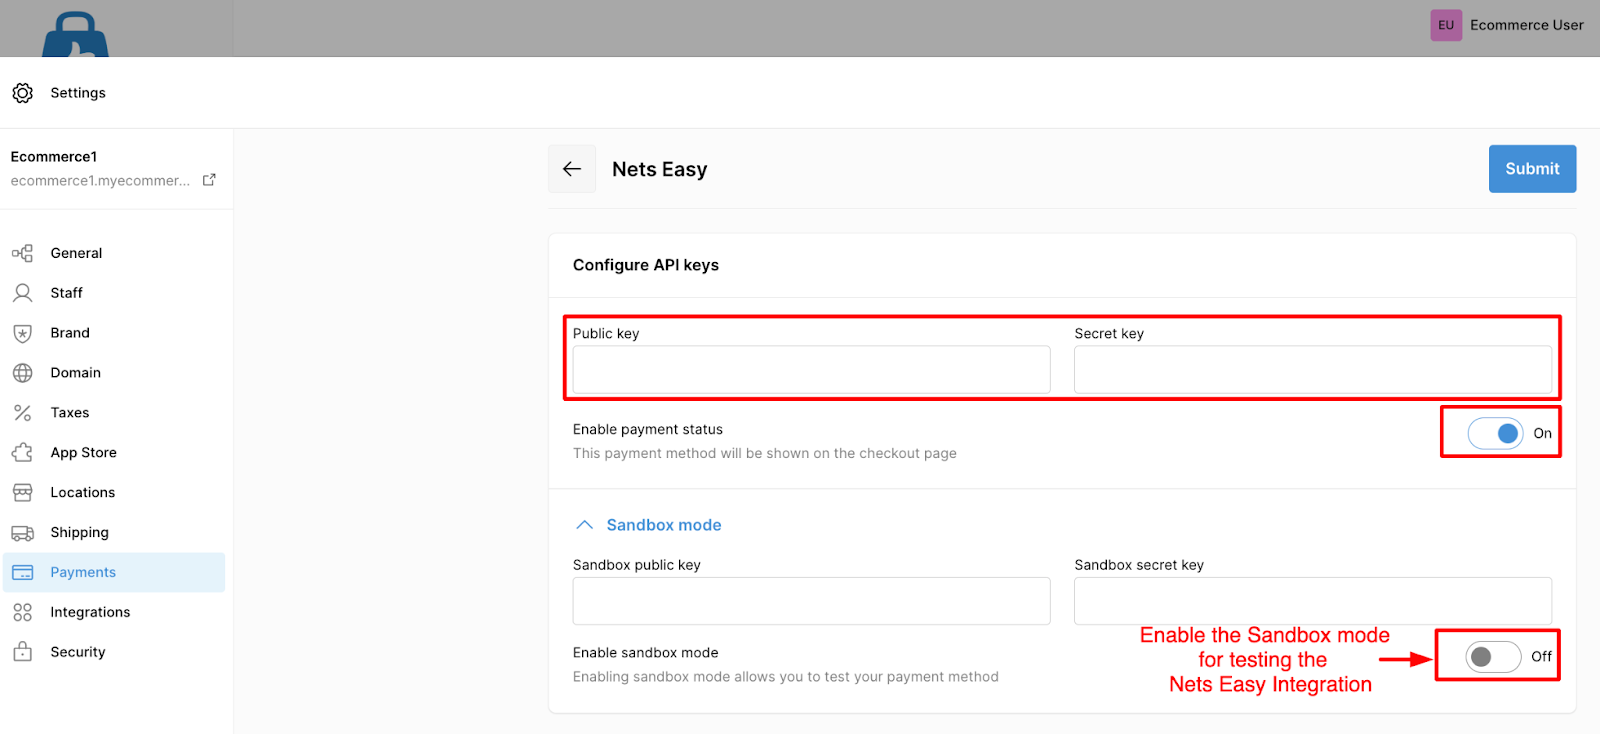
- In the Enable payment method section, switch the toggle to activate Nets Easy.
Step 4: Enter API Credentials
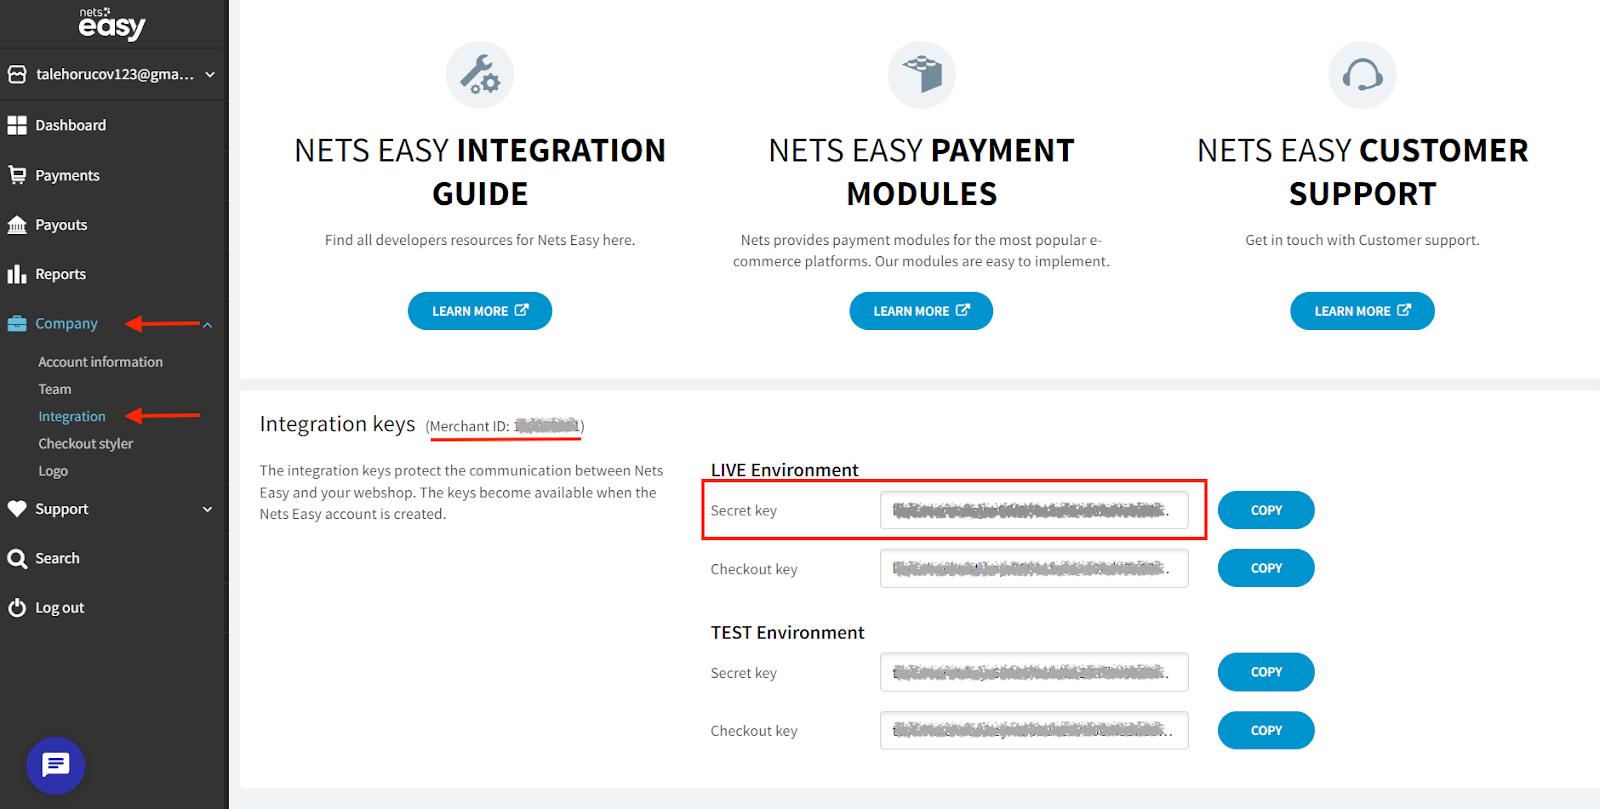
- Retrieve your credentials from your Nets Easy dashboard:
-
Merchant ID (Public Key):
Found at the top of your Nets Easy admin dashboard.
Note: This ID contains numeric digits only.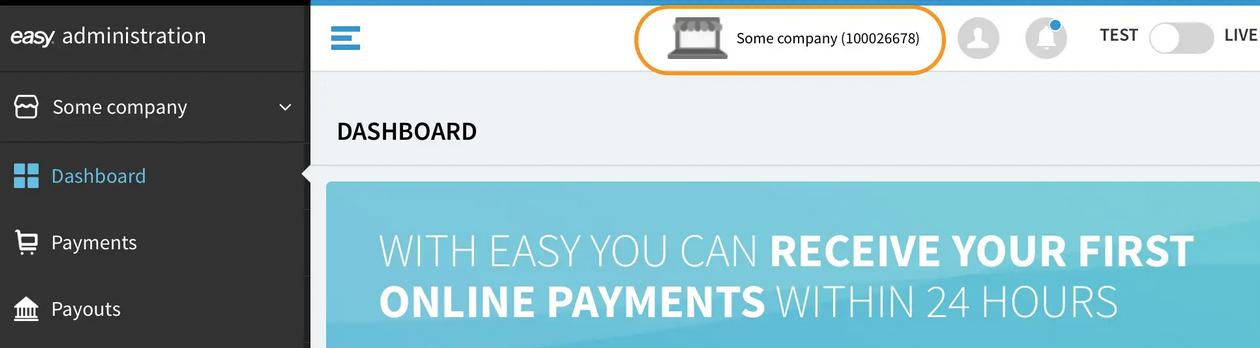
-
Secret Key (Private Key):
Go to Company → Integrations in the left menu.
You will find the Secret Key under the Live Environment.
-
Merchant ID (Public Key):
- Enter the Merchant ID and Secret Key in the corresponding fields in your eCommerce setup window.
- Click Submit to complete the integration.
Nets Easy Supported Currencies
Nets Easy supports merchants operating in European markets with the following currencies:
| Currency Name | Currency Code |
|---|---|
| Danish Krone | DKK |
| Euro | EUR |
| Pound Sterling | GBP |
| Norwegian Krone | NOK |
| Swedish Krona | SEK |
| United States Dollar | USD |
| Polish Zloty | PLN |
| Swiss Franc | CHF |
| Czech Koruna | CZK |
For the most up-to-date currency and payment method eligibility, read more on Where can I find which currencies and payment methods I have.
Nets Easy isn’t available with your Store Currency
If Nets Easy does not appear as a selectable payment provider, your current store currency may not be supported.
To enable Nets Easy, you must switch your store currency to one of the supported currencies.
How to change your Store Currency
- Go to Settings → General in your eCommerce admin panel.
- Open Standards and formats.
- From the Currency dropdown menu, select a currency supported by Nets Easy.