Connecting your domain
Connecting a custom domain allows you to use a professional and branded web address for your online store—such as yourstore.com instead of yourstore.myecommerce.com. This improves brand credibility, makes your store easier to remember, and builds trust with your customers.
Before you begin, ensure you have the following ready:
- A custom domain purchased from a domain provider (e.g., Zencommerce, GoDaddy, Namecheap, Cloudflare).
- Access to your DNS settings with your provider.
- An active paid plan on your eCommerce account.
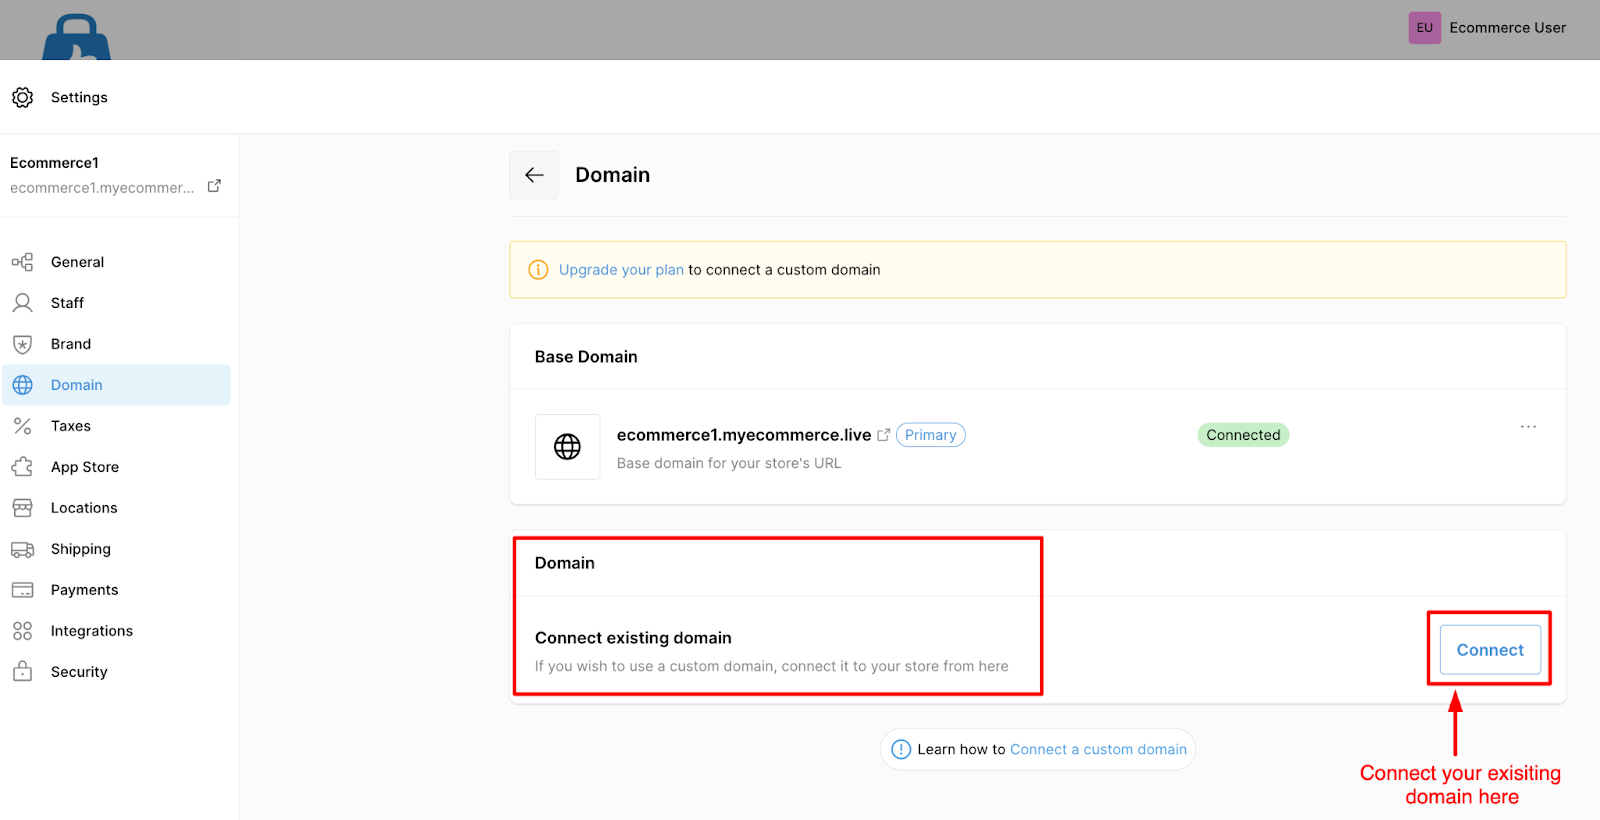
Step 1: Configure the domain in your eCommerce admin panel
- Log in to your eCommerce admin panel.
- Navigate to Settings → Domain.
- Under the Domain section, click Connect.
- Enter your domain (Ex: yourstore.com) and click Save.
Step 2: Configure DNS records with your domain provider
- Log in to your domain provider’s dashboard (such as Cloudflare or GoDaddy).
- Open the DNS settings or Zone Editor for your domain.
- Add the following “A” records:
- Root domain (without www. Ex: yourstore.com)
- Type: A
- Name/ Host: @ (or your chosen subdomain, such as store)
- IP Addresses: 157.180.75.35 | 135.181.109.183 | 65.109.13.94
- WWW Subdomain (Ex: www.yourstore.com)
- Type: A
- Name/ Host: www
- IP Addresses: 157.180.75.35 | 135.181.109.183 | 65.109.13.94
Step 3: Verify your domain connection
After DNS propagation is complete:
- Open your custom domain in a browser (e.g., yourstore.com).
- Confirm that your store loads correctly.
Once the domain resolves successfully, your custom domain is fully connected to your store.
Example: DNS Setup in Cloudflare
| Type | Name | Value |
|---|---|---|
| A | @ | 157.180.75.35 | 135.181.109.183 | 65.109.13.94 |
| A | www | 157.180.75.35 | 135.181.109.183 | 65.109.13.94 |
Change your eCommerce store URL (yourstore.myeCommerce.in)
If you only want to update your default .myecommerce.com store URL (without using a custom domain), you can do so anytime by following these steps:
- Log in to your eCommerce admin panel.
- Go to Settings → Domain.
- Click Edit, next to your current store name.
- Update your .myecommerce.com URL with your preferred store name.
- Click Save.
Your new .myecommerce.com URL will now reflect across your online store and connected sales channels.
Troubleshooting
| Issue | Possible cause | Solution |
|---|---|---|
| Domain isn’t connecting | DNS propagation delay | Wait up to 72 hours after adding “A” records |
| “Domain not found” error | Incorrect IP address | Recheck and ensure all required IPs are added |
You’re all set 🎉
Your custom domain is now connected to your eCommerce store. Customers can access your store using your branded URL, helping improve visibility, trust, and overall brand presence online.