
-
Integrations
- Articles coming soon
-
Marketing
-
- Advertising white-label eCommerce solution to your customer ecosystem
- Advertising compliance and brand usage guidelines for partners
- How to create high-converting advertisements for your eCommerce platform
- How to run advertising campaigns to attract online merchants and resellers
- How to measure advertising performance and generate qualified merchant leads
-
- How to promote your eCommerce platform using consistent branding
- White-Label eCommerce branding strategy for partners
- Crafting effective brand messaging for eCommerce platforms
- Positioning your eCommerce platform for different merchant segments
- Maintaining brand consistency across marketing channels
-
- Creating High-Impact eCommerce marketing assets for partners
- Designing eCommerce sales decks that convert merchants
- Creating eCommerce landing pages that convert traffic into merchants
- Creating eCommerce case studies that build trust and close deals
- Creating Email campaigns that drive eCommerce adoption
-
-
Partner Hub
-
- Articles coming soon
-
- Articles coming soon
-
-
Sales
-
- Articles coming soon
-
- Articles coming soon
-
- Articles coming soon
-
- Articles coming soon
-
- Articles coming soon
-
-
Technical and Support
-
- Articles coming soon
-
- Articles coming soon
-
- Articles coming soon
-
- Articles coming soon
-
- Articles coming soon
-
- Articles coming soon
-
-
-
-
-
-
-
- Payment methods at eCommerce Store
- Setting up Stripe Payment Gateway
- Setting up Paypal in your Online Store
- Setting up CashFree Gateway
- Setting up RazorPay Gateway
- Setting up Paystack gateway
- Setting up Flutterwave Gateway
- Setting up Mercado Pago Gateway
- Setting up Mamo Pay Gateway
- Setting up Yoco Gateway
- Setting up Nets Easy Gateway
- Setting up Vipps Gateway
- Setting up Mollie Gateway
- Setting up Epoint Gateway
- Setting up Iyzico Gateway
- Setting up Payriff Gateway
- Setting up Crypto Payments through Nicky
- What is Cash on Delivery?
- Show Remaining Articles (3) Collapse Articles
-
- How to create an analytics account?
- Connecting Google Analytics to your eCommerce store
- Connecting Meta Pixel to your eCommerce store
- Connecting Tik Tok Pixel to your eCommerce store
- Connecting Google Tag Manager to your eCommerce store
- Managing product reviews & ratings in your eCommerce store
- Using marketing automation to drive urgency and social proof
- Setting up your LLMs.txt integration to boost your AI search visibility
- Automating manual order fulfilment and live tracking with Shiprocket
- Automating search engine discoverability with dynamic sitemaps
- Automate, optimise, scale: Building your Google shopping product feed
- How to sync your product catalog with meta ads to drive more sales
-
- Articles coming soon
-
- Articles coming soon
-
- Articles coming soon
-
Website protection by blackwall
Blackwall is a built-in security layer that helps protect your online store from malicious access. Once enabled, it actively monitors incoming traffic and blocks suspicious or harmful activity before it reaches your storefront — keeping your customers and your site safe.
How Blackwall works
Blackwall analyzes requests coming to your store and automatically blocks any activity that appears malicious or unusual.
For example, if a bot repeatedly tries to access a restricted page or if a suspicious IP keeps requesting your website within seconds, Blackwall immediately stops those attempts.
Blackwall becomes active as soon as your custom domain is connected, ensuring your store is protected once it goes live publicly./
Key security controls
You can configure Blackwall using three types of controls:
Rules
These define how Blackwall should react to traffic.
For instance, you may choose whether certain countries, IPs, or repeated requests should be allowed or blocked.
Rulesets
Rulesets group multiple security rules into easy-to-manage categories.
Example: A ruleset that blocks suspicious bot traffic across several regions at once.
Custom rules
Custom rules allow you to create your own security conditions tailored to your store’s needs.
For example:
- Blocking a specific IP range that previously attempted spam.
- Allowing traffic only from certain regions for internal testing.
- Preventing repeated requests to sensitive URLs.
These options give you flexibility in how you control access to your storefront.
Enabling Blackwall
To activate Blackwall in your admin panel:
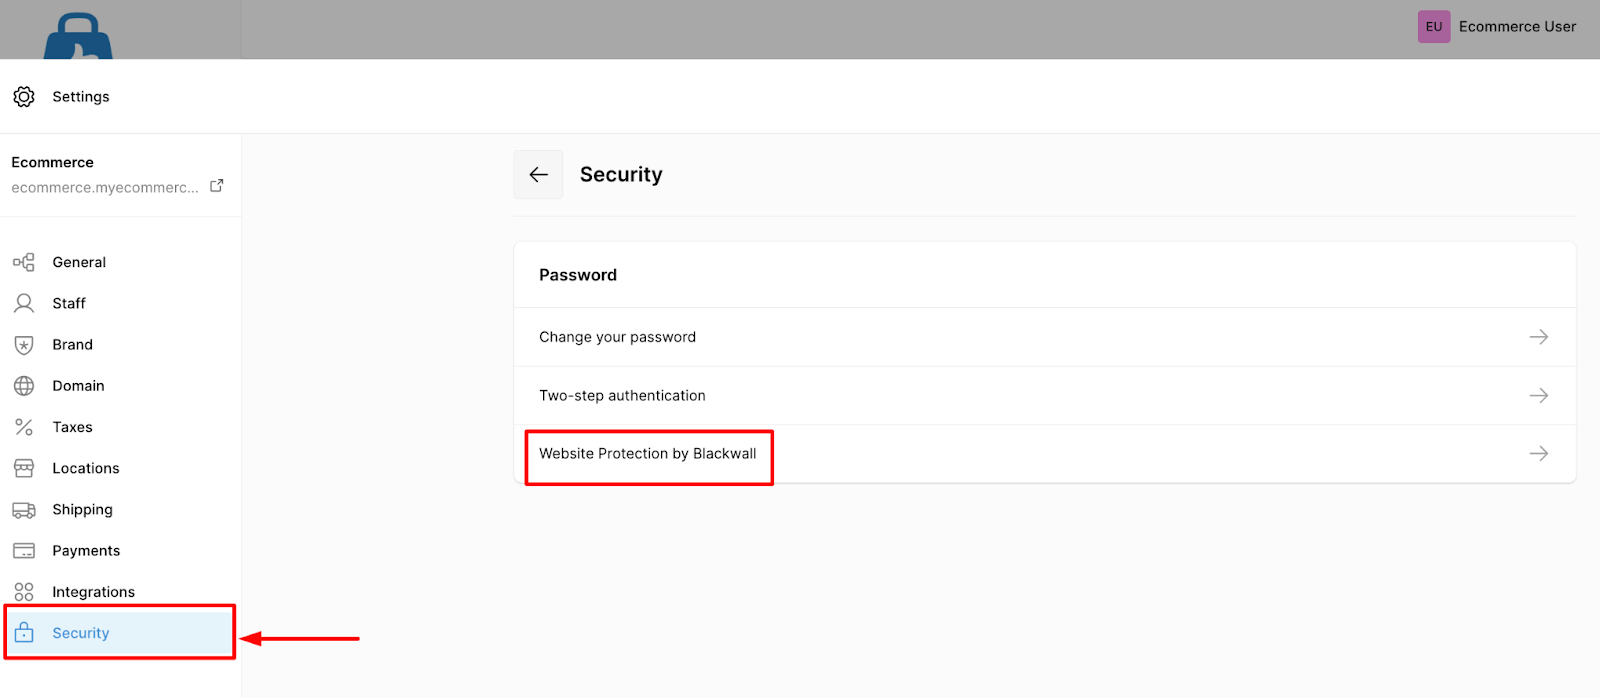
- Open your store in the admin panel. Navigate to: Settings → Security → Website protection by Blackwall to access the full Blackwall dashboard.
- Connect your live/ custom domain. If not already done: Enter your domain → Update DNS → Wait for verification.
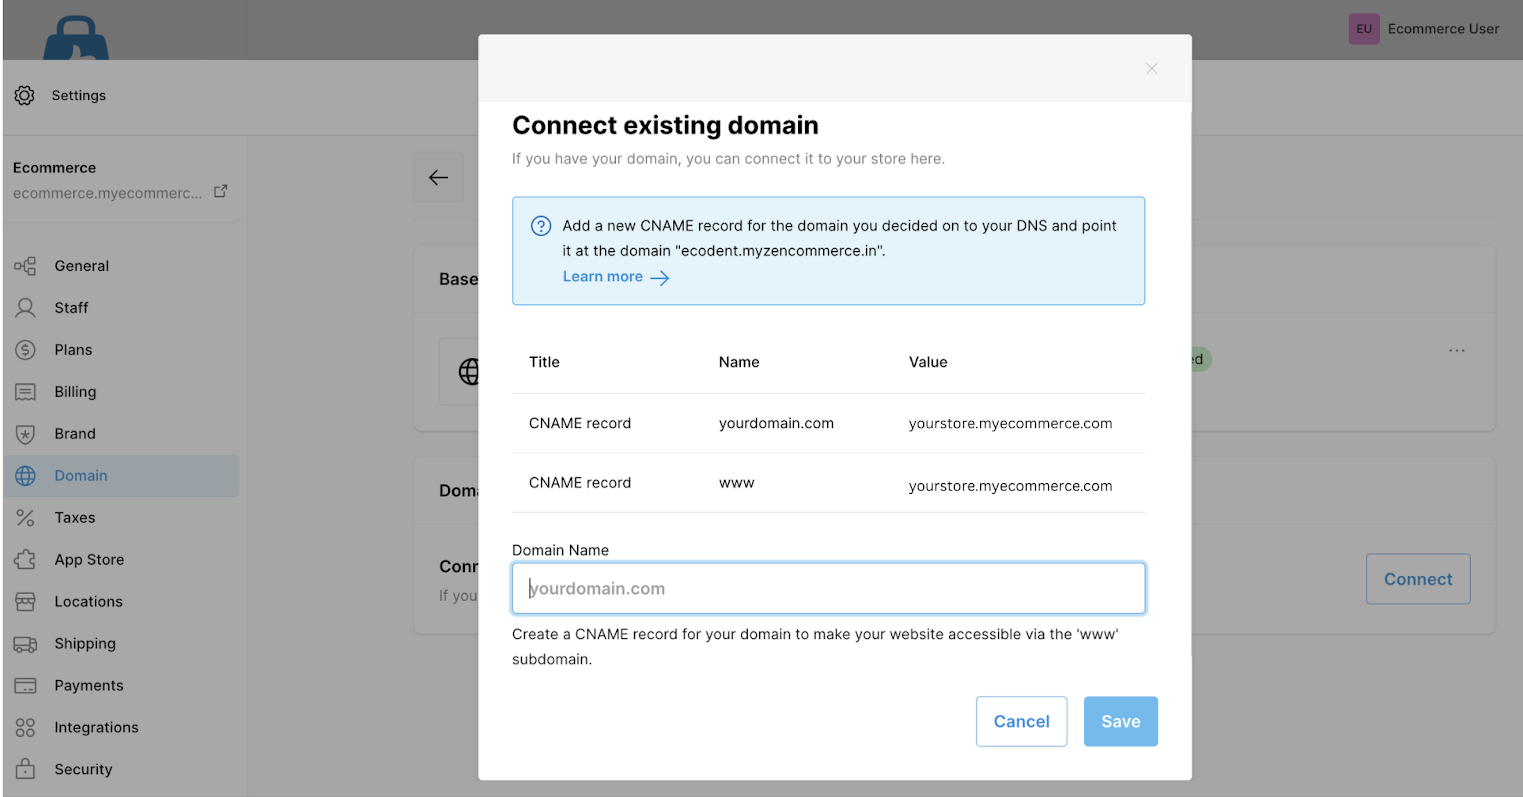 Once enabled, Blackwall immediately begins monitoring all traffic.
Statistics & logs
Blackwall provides built-in reporting tools to help you track security events:
- Statistics show an overview of the blocked and allowed requests.
Example: You might see a sudden spike of blocked attempts from a single country, indicating automated bot activity.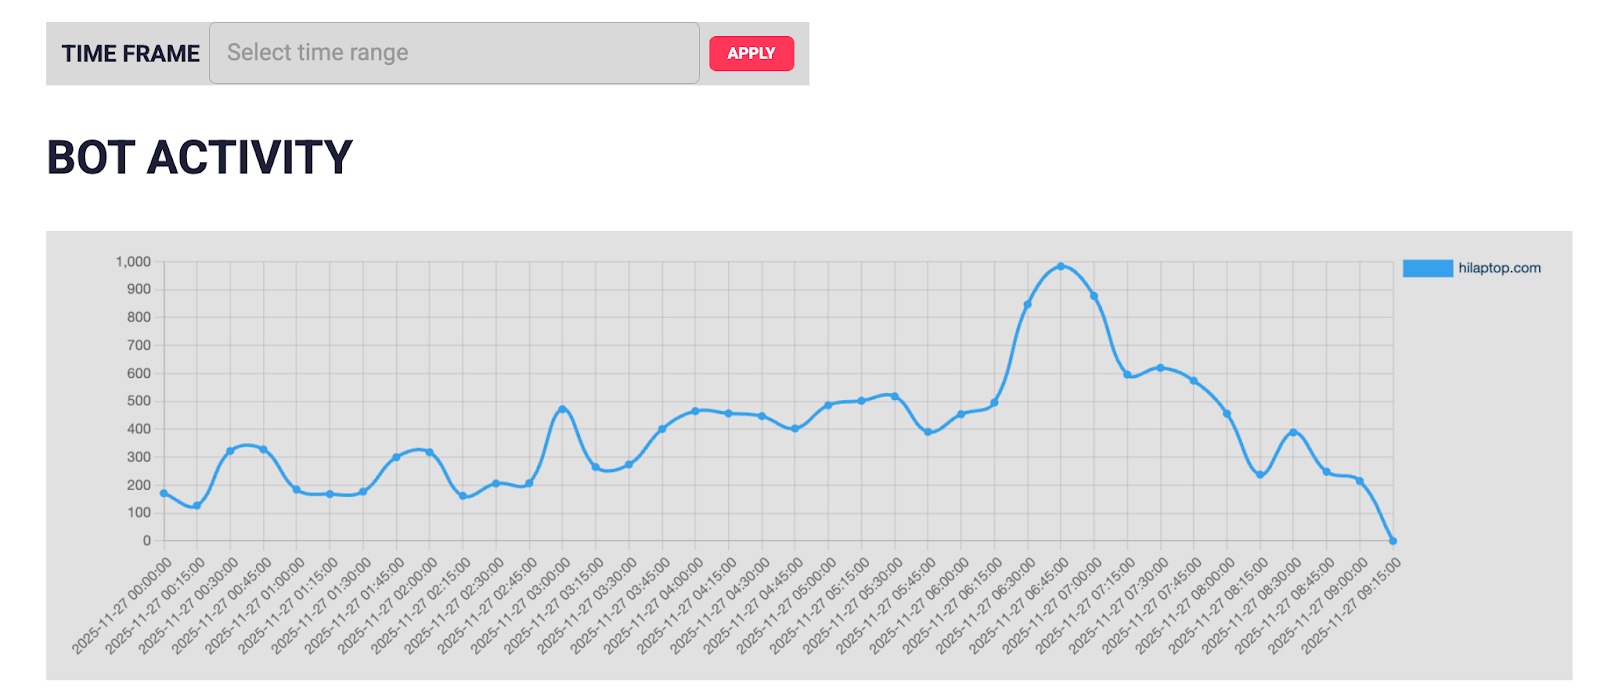
- Logs provide detailed entries of each action taken.
This helps you understand why a visitor was blocked — useful when adjusting custom rules.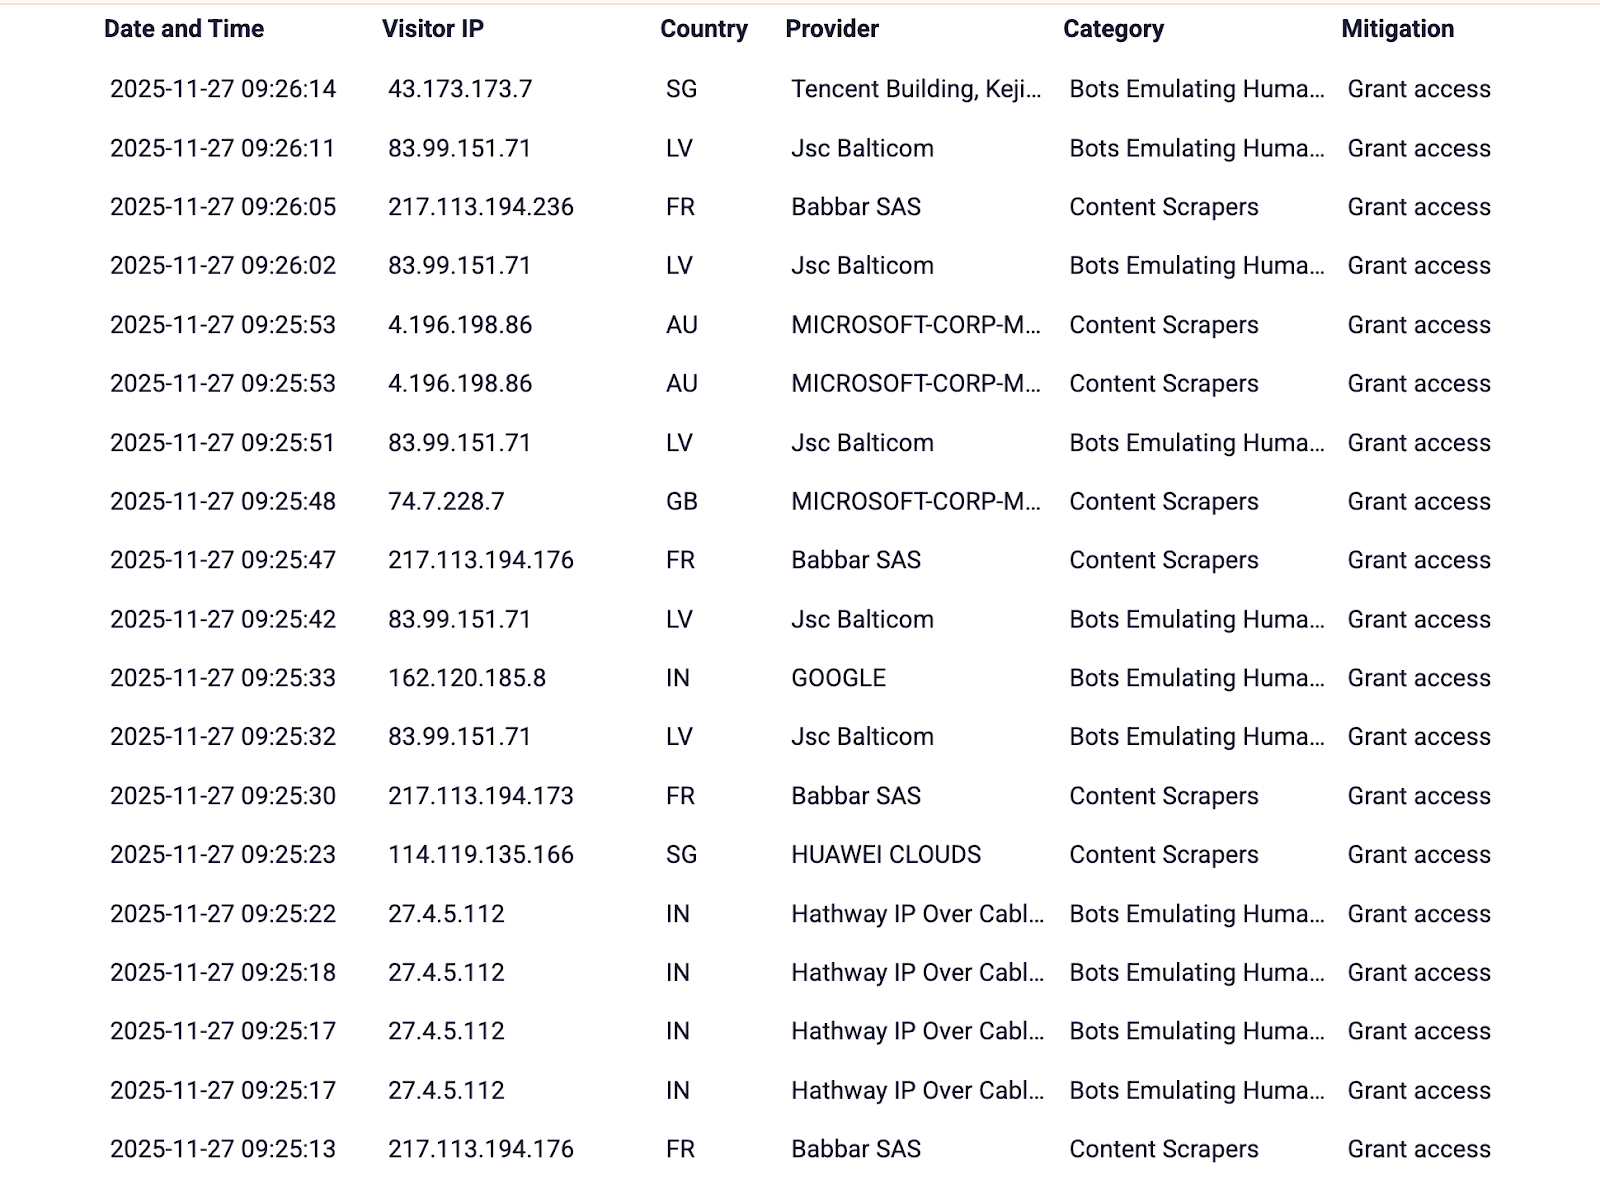
- Enable the Blackwall firewall as soon as your custom domain is connected.
- Review logs regularly to understand traffic patterns and avoid blocking genuine customers.
- Use Custom rules only when you have specific cases, such as repeated spam attempts from a known IP.
- Update your rules if you notice frequent legitimate access being blocked.
Your store, Secured!
With Blackwall enabled, your store gains an active, always-on security shield that protects it from harmful activity while giving you full control through rules, rulesets, and custom configurations.